

Google Tag Manager (GTM) ist ein kostenloses Tag-Management-System, mit dem Sie in Abstimmung mit Ihrem Team Tags zu Ihrer Website erstellen und hinzufügen können. Wenn Sie GTM nicht verwenden, ist die Eröffnung eines Kontos eine großartige Möglichkeit, Ihre Website zu verbessern und Ihr Marketing durch Daten zu verbessern. Hier finden Sie die Grundlagen zur Verwendung von Google Tag Manager.
Was macht Google Tag Manager?
GTM ist ein Tag-Management-System. Die Plattform ist als zentrale Anlaufstelle für Ihr Tag-Management konzipiert und hilft Teams dabei, vorhandene Tags zu verwalten und neue zu erstellen. Wenn Sie mit GTM überhaupt nicht vertraut sind, Lesen Sie unseren Leitfaden, was GTM ist und warum Sie es verwenden sollten.
Bevor wir mit der eigentlichen Verwendung von GTM fortfahren, frischen wir kurz einige wichtige Begriffe auf.
- Schlüsselwörter – Tracking-Codes, die Daten auf Grundlage von Benutzerinteraktionen sammeln.
- Auslöser – Benutzerinteraktionen, die Tags auslösen.
- Behälter – Sammlungen von Tags, Triggern und anderen Konfigurationen, die auf Ihrer Website oder mobilen App installiert sind.
So richten Sie den Google Tag Manager ein
Nachdem wir die Grundlagen von GTM geklärt haben, können wir uns nun der eigentlichen Nutzung der Plattform widmen.
Bevor Sie irgendetwas anderes tun, benötigen Sie einige betriebsbereite Konten.
Google-Konten und ein GTM-Konto
Zur Verwendung von GTM ist das persönliche oder geschäftliche Google-Konto erforderlich, das Sie wahrscheinlich bereits besitzen. Sie benötigen jedoch auch ein separates GTM-Konto. Sie verknüpfen Ihr Konto und die Konten Ihres Teams mit Ihrem neuen GTM-Konto, sodass Sie alle Tags an einem Ort verwalten können.
- Erstellen Sie ein Standard-/persönliches Google-Konto
- Erstellen Sie ein GTM-Konto
- Verbinden Sie Ihr Standardkonto mit GTM
Google erlaubt das Hinzufügen von bis zu 360 Benutzern zu einem einzigen GTM-Konto. Kontoadministratoren können Benutzer auf der Admin-Seite hinzufügen, entfernen und verwalten. Das Hinzufügen neuer Benutzer ist so einfach wie das Eingeben ihrer E-Mail-Adressen und das Befolgen der
Einrichten Ihres GTM-Kontos
Ein GTM-Konto zu erstellen ist ganz einfach. Gehen Sie zunächst zu die GTM-Website und klicken Sie oben rechts auf Ihrem Bildschirm auf „Konto erstellen“.

Erstellen Sie ein neues Google Tag Manager-Konto
Als Nächstes werden Sie aufgefordert, einige grundlegende Informationen einzugeben:
- Kontobezeichnung
- Land auswählen
- Containername
- Zielplattform
Anders als bei Ihrem persönlichen Google-Konto sollte der Name Ihres GTM-Kontos normalerweise der Name Ihres Unternehmens oder Ihrer Website sein. Geben Sie als Nächstes das Land ein, in dem Sie ansässig sind, und erstellen Sie dann einen Namen für Ihren ersten Container. Dies wird der erste Container Ihres Kontos sein, Sie können jedoch insgesamt bis zu 500 erstellen. Geben Sie abschließend Ihre Zielplattform ein. GTM unterstützt Websites, iOS und Android sowie AMP.
(Hinweis: Im Folgenden sprechen wir nur noch von „Websites“, aber alle diese Informationen gelten unabhängig von Ihrer Zielplattform.)
Sobald Sie Ihre Daten eingegeben haben, klicken Sie auf „Erstellen“ und akzeptieren Sie die Nutzungsbedingungen von Google. Jetzt ist Ihr Konto vollständig und einsatzbereit!
Google Tag Manager installieren
GTM arbeitet mit dem vorhandenen Code, der Ihre Website betreibt, um Daten zu sammeln. Das bedeutet, dass Sie einen Codeausschnitt installieren müssen, der dabei hilft, Ihre Website im GTM-System zu identifizieren. Dies wird als Ihr Container-ID-CodeStellen Sie es sich wie die Verbindung zwischen Ihrem GTM-Konto und Ihrer Website vor. Anstatt neue Tags manuell direkt zu Ihrer Website hinzuzufügen, erstellen und veröffentlichen Sie Tags auf GTM. Anschließend stellt GTM eine Verbindung mit Ihrem Container-ID-Code her, um das Update zu implementieren.
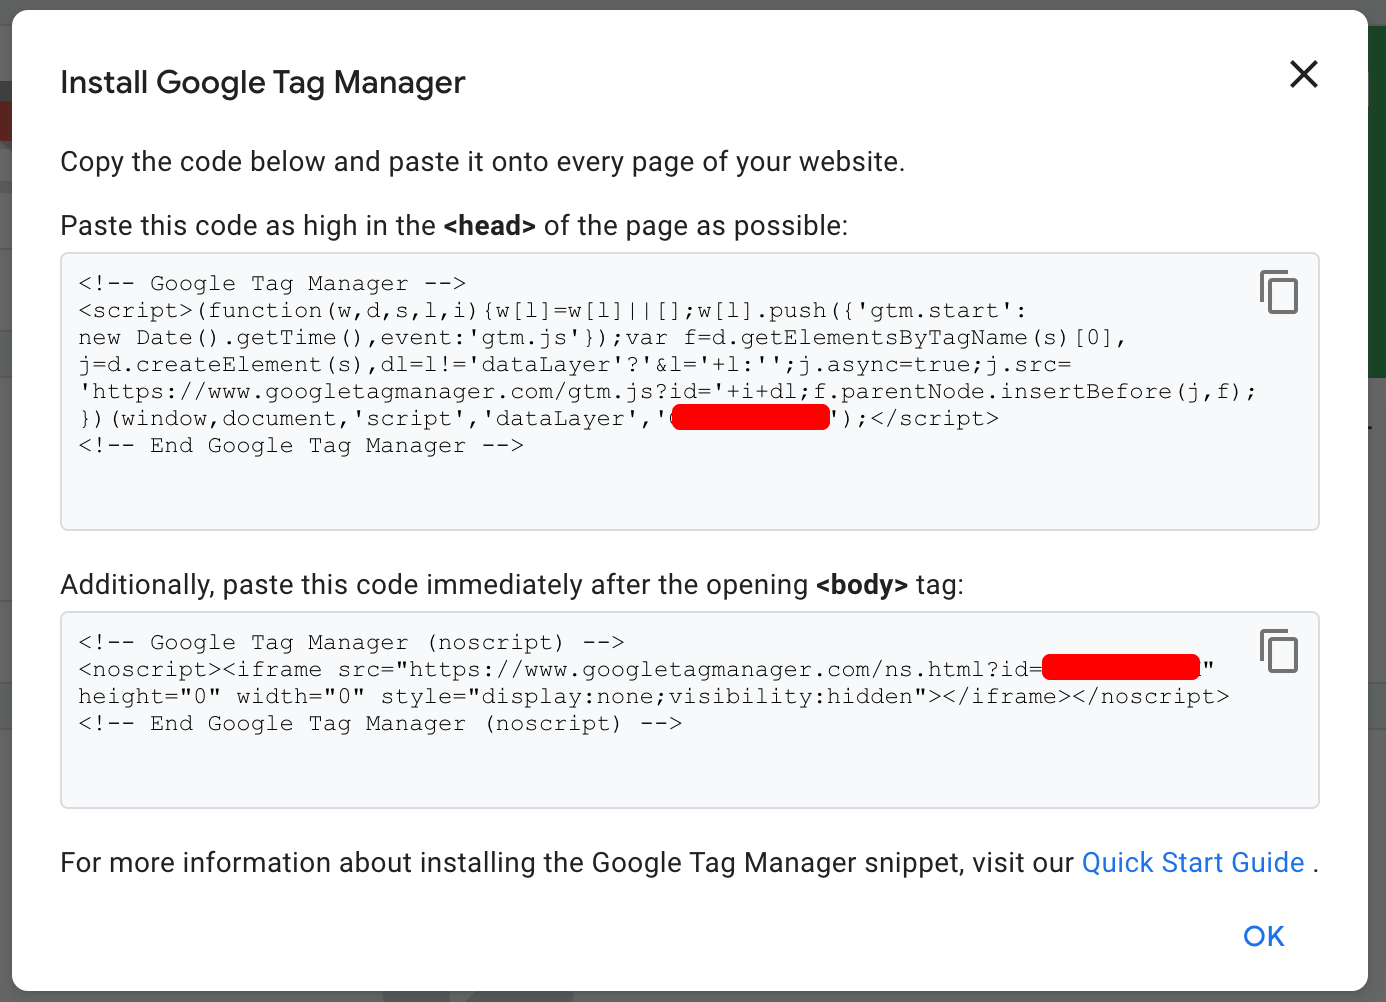
GTM hinzufügen. So sieht das Snippet aus. Fügen Sie es Ihrem Website-Code hinzu.
Glücklicherweise macht Google dies einfach und stellt automatisch Ihren ganz persönlichen Container-ID-Code bereit. Sie müssen ihn nur kopieren und auf jeder Seite Ihrer Website einfügen.
Wie greife ich auf meinen Container-ID-Code zu?
Sie sollten auf Ihren Container-ID-Code zugreifen und ihn auf jeder Seite Ihrer Website hinzufügen, bevor Sie mit der Erstellung von Tags beginnen. Der erste Bildschirm, den GTM Ihnen nach der Erstellung eines Kontos zeigt, enthält Ihren Container-ID-Code mit Anweisungen zum Kopieren und Einfügen des Snippets auf Ihren Seiten. Wenn Sie jedoch nicht bereit sind, Ihre ID sofort zu Ihrer Website hinzuzufügen, erfahren Sie hier, wie Sie später darauf zugreifen können.
- Melden Sie sich bei Ihrem GTM-Konto an und öffnen Sie einen Container.
- Schauen Sie sich als nächstes den oberen rechten Teil Ihres Bildschirms an. In der Nähe der Schaltfläche „Senden“ finden Sie eine Buchstabenfolge, die mit beginnt
GTM-. Das ist Ihre Container-ID. - Klicken Sie auf die ID und Ihr Container-ID-Code wird angezeigt.
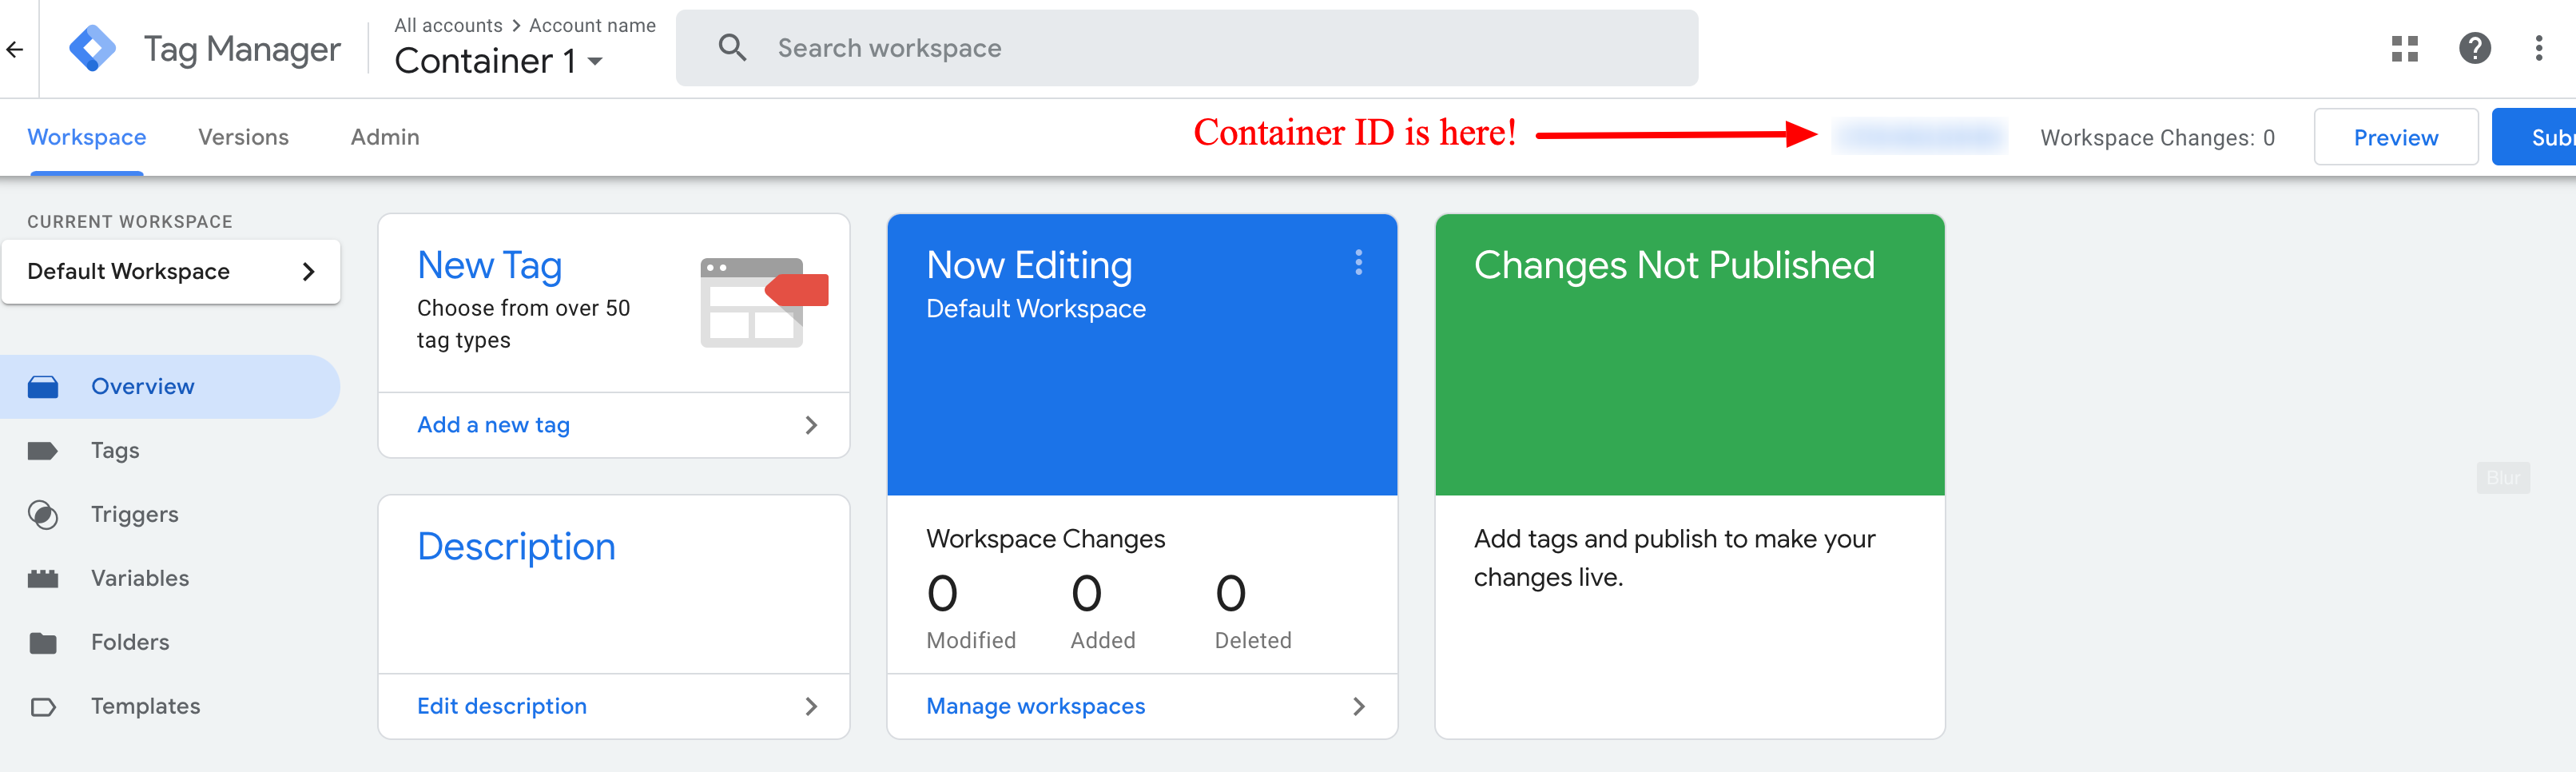
Klicken Sie hier, um den Codeausschnitt anzuzeigen und auf Ihre Website zu kopieren.
Was beinhaltet mein Container-ID-Code?
Ihr Code besteht technisch gesehen aus zwei Teilen (sie sind von GTM klar getrennt und gekennzeichnet). Der erste sollte dem Ihrer Seiten, die zweite sollte hinzugefügt werden zu . Google empfiehlt, den ersten so weit oben wie möglich in der . Der zweite muss unmittelbar nach der Öffnung hinzugefügt werden -Tag.
Beide Codeschnipsel fungieren als Links zwischen Ihrem GTM-Konto und Ihrer Website. Der zweite Codeschnipsel hilft jedoch insbesondere in Situationen, in denen JavaScript deaktiviert ist.
Der wichtigste Teil Ihres Container-ID-Codes ist die ID selbst — der Teil, der mit beginnt
Wie installiere ich GTM auf Plattformen wie WordPress?
Machen Sie sich keine Sorgen, wenn all das Gerede über Code ein wenig verwirrend ist. Sie müssen Ihre eigene Website nicht codieren, um GTM zu verwenden. Wenn Sie eine Plattform wie WordPress verwenden, können Sie Ihrer Site trotzdem Ihren Container-ID-Code hinzufügen.
Es gibt viele Möglichkeiten, dies zu tun, aber die Verwendung des Google Tag Manager-Plugins für WordPress ist eine super einfache Option. So funktioniert es.
- Nach der Aktivierung des Google Tag Manager für WordPress-Plugins über den Plugins-Menü, gehen Sie zu den Einstellungen und scrollen Sie nach unten, um zu suchen Google Tag Manager.
- Gehen Sie zu Ihrem GTM-Konto und kopieren Sie Ihre Container-ID. Sie benötigen nicht den gesamten Codeausschnitt, sondern nur den Teil, der mit beginnt
GTM- . - Gehen Sie zurück zu WordPress, klicken Sie auf das GTM-Plugin und fügen Sie dann Ihre Container-ID in das bereitgestellte Feld ein.
Nachdem Sie Ihre ID eingefügt haben, werden Ihnen einige Platzierungsoptionen angezeigt. Ihre Auswahl bestimmt, wo der Container-ID-Code auf Ihren Seiten platziert wird. Die meisten dieser Optionen folgen nicht der von Google empfohlenen Platzierung. Wählen Sie daher Maßgeschneidert.
Nach der Auswahl Maßgeschneidert, kopieren Sie die Codezeile unten auf der Seite. Wählen Sie als Nächstes Aussehen aus Ihrem Menü, und klicken Sie dann auf Themeneditor. Ihnen wird ein Code angezeigt, aber keine Sorge – Sie müssen nur die Zeile einfügen, die Sie kopiert haben. Es ist keine tatsächliche Codierung erforderlich.
- Auf der rechten Seite Ihres Bildschirms unter Themendateien, suchen header.phpWählen Sie diese Option aus und suchen Sie dann nach Ihrer Öffnung Tag. Dies sieht genauso aus wie der fettgedruckte Text und erscheint oben im Code.
- Fügen Sie die kopierte Codezeile direkt unter der Öffnung ein Tag, und klicken Sie dann auf Update-Datei am unteren Rand Ihres Bildschirms.
- Gehen Sie abschließend zurück zum Google Tag Manager für WordPress-Plugin und klicken Sie auf Änderungen speichern.
Und fertig! GTM ist jetzt mit Ihrer WordPress-Site verknüpft.
So nutzen Sie den Google Tag Manager: Daten analysieren, Tags hinzufügen und Fehler vermeiden
Nachdem wir nun den Einrichtungsprozess von Google Tag Manager behandelt haben, sprechen wir über das Hinzufügen von Tags, das Analysieren von Daten und ein paar wichtige Hinweise zur richtigen Verwendung von Google Tag Manager.
Als Erstes: Google Analytics vorbereiten.
Einrichten von Google Analytics
GTM bietet keine Tools zur Datenanalyse. Stattdessen verbinden Sie Ihr GTM-Konto mit Google Analytics oder einer anderen Analyseplattform. Normalerweise ist es am besten, bei Google Analytics zu bleiben, anstatt bei
- Erstellen Sie ein Google Analytics-Konto. Genau wie GTM erfordert Google Analytics ein separates Konto. Sie können hier ein Konto eröffnenGoogle Analytics ist kostenlos und lässt sich problemlos mit GTM koppeln. Daher ist es normalerweise die beste Option zum Analysieren von Daten aus Ihren GTM-Tags.
- Finden Sie Ihren Ausweis. Ihr Google Analytics-Konto hat eine eindeutige ID, die es mit GTM verbindet. Diese ID ist erforderlich, um das Tag hinzuzufügen, über das wir im nächsten Abschnitt sprechen. So finden Sie es.
- Öffnen Sie Google Analytics und suchen Sie nach dem Administrator Tab.
- Klicken Sie auf der linken Seite Ihres Bildschirms auf Tracking-Informationen, dann klick Sendungs-Code.
- Suchen Sie nach der Zeichenfolge, die beginnt mit
UA .

Klicken Sie auf Verfolgungscode
Wenn Sie die ID gefunden haben, speichern Sie sie für das Hinzufügen Ihres ersten Tags.
Tags im Google Tag Manager hinzufügen
Nachdem Ihr Google Analytics-Konto einsatzbereit ist, ist es an der Zeit, Ihr erstes Tag hinzuzufügen. Es gibt unzählige Tags, aber wir erklären Ihnen nur, wie Sie das klassische Google Analytics-Tag hinzufügen, damit Sie sich ein Bild vom Vorgang machen können. Sie benötigen die ID aus dem vorherigen Schritt, also halten Sie sie bereit.
(Hinweis: Das Hinzufügen einiger Tags erfordert technisches Geschick. Wenn Sie mit der technischen Seite Ihrer Website nicht vertraut sind, ist es möglicherweise eine gute Idee, mit einem Teammitglied zusammenzuarbeiten, das
- Greifen Sie auf das GTM-Dashboard zu und klicken Sie auf „Neues Tag hinzufügen“. Nachdem Sie auf Neues Tag hinzufügen, geben Sie einen Namen für Ihr Tag ein und klicken Sie dann irgendwo in der Tag-Konfiguration , um den Einrichtungsvorgang zu starten.
- Wählen Sie einen Tag-TypWählen Sie für dieses Beispiel Klassisches Google Analytics aus dem Menü. Dieses Tag ist relativ einfach einzurichten und ist ein guter Ausgangspunkt für Websites ohne Tags.
- Verknüpfen Sie Ihr Tag mit Google Analytics. Hier wird die ID beginnend mit
UA kommt herein. Fügen Sie die ID in das Feld mit der Aufschrift ein Web-Eigenschafts-IDDadurch wird Ihr Tag mit Google Analytics verknüpft. - Wählen Sie Ihren Track-Typ und Trigger. Nachdem Sie Ihre ID eingegeben haben, können Sie Ihre StreckentypSie haben mehrere Möglichkeiten, darunter Seitenansicht (Page View). Diese Option verfolgt Daten, wenn eine Seite aufgerufen wird. Es ist also ein gutes Tag, um erste Daten auf Ihrer Website zu erhalten. Wählen Sie als Nächstes Ihren Trigger aus. Wenn Sie noch keine Tags haben, wählen Sie Alle Seiten ist intelligent. Dadurch erhalten Sie Einblicke, wenn jemand auf eine Ihrer Seiten zugreift. Dies ist daher nützlich, um einen Basisdatensatz zu erhalten.
- Speichern, übermitteln und veröffentlichen Sie Ihr TagWenn Sie mit der Konfiguration Ihres Tags fertig sind, klicken Sie auf das blaue Gespeichert Klicken Sie anschließend auf AbsendenWählen Sie auf diesem letzten Bildschirm Veröffentlichen und Version erstellen, dann klick Veröffentlichen um das Tag offiziell zu Ihren Seiten hinzuzufügen.
Datenanalyse mit Google Analytics
Sobald Sie Ihr klassisches Google Analytics-Tag veröffentlicht haben, können Sie mit der Datenanalyse beginnen.
GTM-Tags arbeiten im Hintergrund, um Daten zu kompilieren. Machen Sie sich also keine Gedanken über den eigentlichen Datenerfassungsprozess. Melden Sie sich stattdessen bei Ihrem Google Analytics-Konto an, um zu überprüfen, was Ihre Tags gesammelt haben.
Beachten Sie, dass nicht alle GTM-Tag-Daten an Google Analytics weitergeleitet werden. Wenn Sie beispielsweise ein Google Ads Remarketing-Tag verwenden, wie wir es in unserer Einführung zu GTM besprochen haben, arbeiten Sie hauptsächlich mit diesen Daten auf der Google Ads-Plattform.
Drei Dinge, die Sie beachten sollten
Beachten Sie diese drei Dinge, wenn Sie mit der Erstellung von Tags beginnen.
- Vergessen Sie nicht die vorhandenen Tags. Wenn Sie bereits einige Tags direkt auf Ihrer Website implementiert haben, ist es eine gute Idee, diese zu entfernen und Ihr gesamtes Tag-Management auf GTM zu belassen. Verwenden Sie fest codierte Tags (d. h. in Ihre Website integrierte Tags). und GTM-Tags können zu Fehlern führen wie
Doppelzählung Kennzahlen wie Seitenaufrufe. - Gehen Sie beim Tracking zurückhaltend vor. Zu viele Tags können Ihre Website verlangsamen – wenn Sie also mit zwei statt drei Tags dieselben Daten erhalten, verwenden Sie einfach zwei.
- Überprüfen Sie Ihre Groß- und Kleinschreibung. GTM befasst sich mit sehr technischen Aspekten Ihrer Website, sodass Tippfehler große Auswirkungen auf Ihre Seiten haben können. Denken Sie neben der Suche nach offensichtlichen Tippfehlern daran, dass die meisten GTM-Felder
Groß- und Kleinschreibung („A“ ist nicht dasselbe wie „a“).
Beginnen Sie heute
Es dauert definitiv eine Weile, bis man GTM beherrscht, aber der Einstieg ist einfacher als Sie denken – und es ist eine der besten Möglichkeiten, Ihr Geschäft zu verbessern. Also legen Sie noch heute los!

- Sie sind noch nicht auf Google Analytics 4 umgestiegen? Darum sollten Sie das jetzt tun
- Google Analytics 4 (GA4)-Grundlagen für E-Commerce-Unternehmen
- Google My Business 360: So gewinnen Sie einen lokalen Wettbewerb
- So verdienen Sie ganz einfach mehr mit Google My Business
- So fügen Sie Google Analytics zu Ihrem Online-Shop hinzu
- Was ist Google Tag Manager?
- So verwenden Sie Google Tag Manager
- Was ist die Google Search Console?
- So richten Sie die Google Search Console ein und verwenden sie
- Der ultimative Leitfaden zu Google Docs


