


Part of having a successful online store is having products that people actually want to buy. And many times, that means having products that are “trendy.”
The trouble is, finding trending new products can be tough — by the time you track down a source, the fad is over, and they’re no longer in demand. Or other times, you’re just not sure where to even begin.
In this post, we’re going to explore how to find trending products to sell online. By the time you finish reading this, you’ll be ready to source and spot fantastic,
How Do I Find New Trending Products?
When searching popular products to sell, it’s better to combine several tactics to get a better understanding of what customers are looking for. Don’t limit yourself to only one resource or tool from the list below: the more sources you explore, the higher chance you have of finding the next big hit.
Now let’s jump to how to find trending products to sell online:
Explore Google Trends
If you’re not sure about the viability of a particular product you want to sell, you can study its trendiness and popularity by simply typing it into Google Trends.
Using this free tool, you can quickly and easily see search volume trends over time (search volume is a number of searches for a keyword during a selected period). You can see whether or not a product is on the rise — or on the decline search
Say, you want to sell yoga mats. To get started, go to Google Trends and type in “yoga mats” to see what the search volume looks like. You’ll see this:
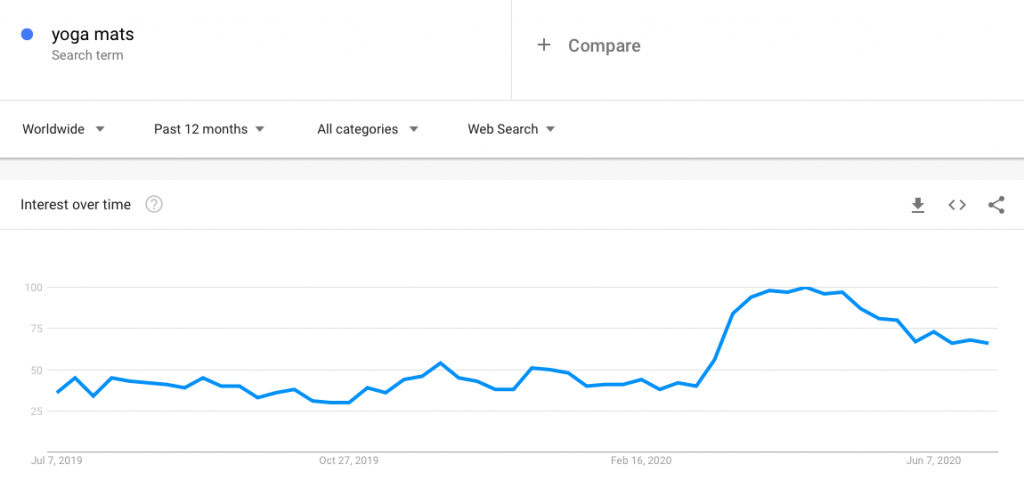
As you can see, there has been a rise in interest for “yoga mats” searches in March. Which coincides with the beginning of the
Google Trends helps to see how users’ interest changes over time. For example, at the graph above, you can see that there has been a slight decrease in “yoga mats” searches in May, but the interest is still quite high compared to before spring.
As a rule of thumb, if you see that your product is on a downhill slope in regard to search volume, it’s not a good sign — this is not a hot new product, and you should look elsewhere.
Browse popular products in online marketplaces
Aside from getting a general indication of trend popularity, you can also hack into existing online marketplace tools to discover which products are top sellers. There is a lot of information to sort through, but starting here will help you better understand which types of products are standing out as peak sellers within the market.
Check out marketplaces to easily find out which products are their best sellers:
- eBay best sellers
- Amazon best sellers
- Best selling items on Etsy
- Aliexpress (choose a category and sort search results by orders)

Apart from the Best Sellers section, you can find trending Amazon products in a special list of items that have experienced the biggest gains in sales ranking over the past 24 hours. It’s called Amazon Movers and Shakers and it’s updated on an hourly basis.
There are also
Another example of a

Study influencers in your niche
Influencers can also be a great way to get a heads up on trending products early in the game. Pay attention to influencers and thought leaders within your niche, and see what products they stand behind and support in their social media efforts. With their large followings and social pull, they often are the ones causing the shifts and trends that lead to
Vlogger Casey Neistat is a great example of this.

Image: howilabs.com
As an early supporter of the electric skateboard Boosted Board, he has featured this product in his daily vlogs and relentlessly helped bring attention to the product. With more than 12M subscribers to Neistat’s channel, this has no doubt helped evangelize some supporters and fans. Today, the product is trending — and sales are booming.
The lesson: find influencers your target customers are paying attention to
Peruse trend publications & blogs
There are many different trend publications and blogs you can explore to get some ideas about trending products for your online business. These are aimed at helping entrepreneurs hit home runs with products that sell, even if they are new and emerging within the market. Whether they’re curated collections or
Here are a few different options to consider:
- Trend Hunter: An online community of global members who are interested in sharing and inspiring the newest trends
- Trend Watching: Independent firm of professionals from around the globe
- Springwise: A newsletter full of free new trend data and ideas from worldwide submissions
- Cool Material: Discovery site for men’s product trends and consumer goods
- Ecomhunt: A product curation website where trending products are added on a daily basis
- Uncrate, Cool Material, Bless This Stuff are popular consumer product blogs and magazines of curated men’s products
- PSFK: a platform that provides research and insights in retail.

Fashion trends in July 2020 by TrendHunter
Are you going to find a blog or magazine that tells you exactly which trending product is right for your business? No, but that would be nice, wouldn’t it?
Like the other options we’ve listed so far, these resources are helpful for formulating a plan — but can’t tell you which product is a surefire win.
Search for trending product ideas on YouTube
YouTube is a massive search engine, so don’t forget to watch some videos too.
Search for “trending products 2021” to get a general idea of what’s popular right now. If you already know what you want to sell, you can also discover trends in a specific niche — just type “X trends 2021” or “best X in 2021” where X is your product.
Trending products are often featured in unboxing videos. Just search for “unboxing” and see some popular products in search results. Don’t forget to browse video reviews as well. Roughly speaking, the more views the video has, the more demand for a product you can expect.
Again, only use YouTube as an ideas database. It can give you ideas for hot new products to sell, but it can’t provide you a guarantee.
Also, check out YouTube Culture & Trends, it’s a public repository for useful YouTube data and explanations of current trends. Here you can find information about creators, artists, videos, and, most importantly, trends happening around the world. You won’t necessarily find a

You can learn more about trends on the Discover page of YouTube Culture & Trends
Check trending sections on popular online stores
Some popular retailers allow filtering products not only by product types, colors, or brands but also by trends. Use these filters to your advantage! This lifehack is especially useful if you sell apparel, as industry giants regularly update hottest fashion trends on their websites.
For example, Missguided has a “Shop by Trend” section. You can see that snake print, faux leather and milkmaid dresses are popular right now. Plus, some of the clothes are also tagged “#trending” and “going fast🔥” — pay special attention to them.

ASOS also has a “Trending now” section which can be sorted by style, new items, or product types.

You can find such sections on many websites, or browse other similar pages like “Editors” picks” and “Inspiration”, or look through the platform’s blogs.
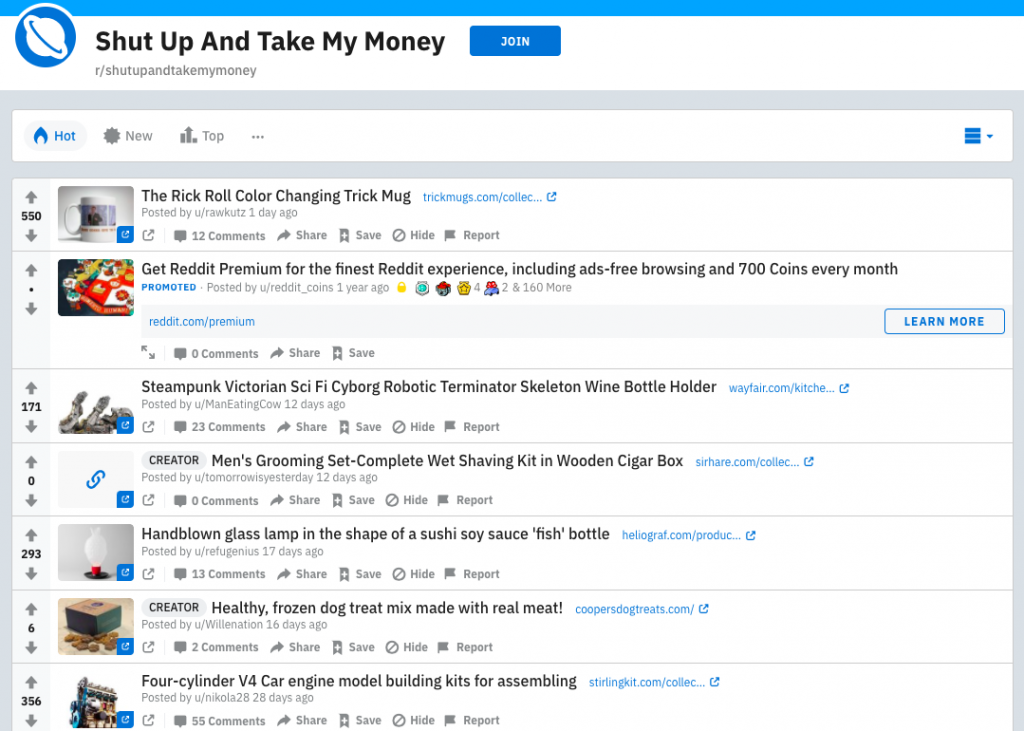
Browse subreddits dedicated to shopping
Reddit is a social news aggregation and discussion website that allows users to vote on content that other users have submitted. There are lots of communities (subreddits) on Reddit dedicated to all kinds of themes, including shopping.
Reddit users discuss and recommend products, share deals and coupons. Looking through such subreddits, you can get an understanding of what shoppers are searching for when shopping online.
For example, you can start with browsing these pages:
- Shut Up and Take My Money: this subreddit is about creative and unusual products
- Find It On Amazon: users share links to products on Amazon
- Good Value Products: as the subreddit’s description states, it’s dedicated to “the best value for money” items.
Click on the “Hot” button to filter subreddits and see the most popular products:
Go to Pinterest
People use Pinterest to find ideas for their interests and hobbies and to plan purchases. 63% of millennial Pinners use this visual discovery engine to look for new products and brands.
Most popular categories on Pinterest are DIY, home decor, food, travel, health, beauty, fashion, and events. Users save ideas they like on their Boards, add their own Pins, and explore Topics — feeds of Pins about a particular category.
Each Pin shows how many times it was saved. This helps to see what products are popular among Pinterest users. You can simply type in keywords into the search or browse Topics tab.
Topics are feeds of Pins about a particular category. Each feed contains “10 best ideas and inspiration” for a certain Topic, so you can see what users liked the most.

2,5 thousand users saved these sneakers to their boards
Check Popular sections on wish list websites
People use wish list websites to save products they want to buy or receive as a gift. Some of those sites also have selections of popular items — products that were saved to wish lists many times. One more place for you to look for trending product ideas! To get started, browse the Popular page on My Wish Board or Popular Wish List Gifts on My Registry.
You can also look for products on websites that feature creative gift ideas like Odditymall, Uncommon Goods, or Interesting Finds page on Amazon.
Look for popular products on b2b marketplaces
We’ve already mentioned searching marketplaces that are intended for consumers (like Amazon and Aliexpress), but it’s also worth checking out
Look for sections like “Hot Buys”, “Most Popular”, “Top 20 Products” and then filter them by categories, number of orders, or countries.
Here are some

You can filter top ranking products on Alibaba by categories and countries
Use the Think with Google tools
Think with Google is a project that provides you with tools for researching consumer behavior and articles to learn more about the market. With its help, you can:
- find out what your potential customers are engaging with
- find trending products and retail categories
- identify your audience and potential markets
- see how you can differentiate your company from competitors
The tool set is quite rich in features, so be sure to explore its capabilities for your business. For example, with the Shopping Insights tool, you get personalized reports via email with weekly and monthly trends for categories and products relevant to your business.

Rising Retail Categories tool identifies
What Products Are in High Demand?
Now that you know how to find trending products to sell online, check out our lists of hot product ideas for inspiration:
Time to Find Trending Products to Sell Online
The key to finding trending products is doing your research and being proactive about discovery.
Not only do you need to spot a popular product, but you also have to source it, stock it, list it in your store, and then market it to the right audience. So when you find
Keep in mind, demand for some trending products may change with a season. It doesn’t mean you shouldn’t sell seasonal products. However, you do need to offer other items that’ll drive customers to your store during
- New Product Ideas to Sell Online: Current Trends
- Top 15+ Trending Products to Sell in 2023
- How to Find Products to Sell Online
Hot Eco-Friendly Product Ideas to Sell Online- Best Products to Sell Online
- How To Find Trending Products To Sell Online
- How to Create Demand For Unique Products
- How to Develop a New Product that Solves a Problem
- How To Evaluate Product Viability
- What is a Product Prototype
- How to Create a Product Prototype
- How to Figure Out Where to Sell Your Products
- Why You Should Sell Unprofitable Products
- White Label Products You Should Sell Online
- White Label vs Private Label
- What is Product Testing: Benefits and Types


