

Do you dread having to write and send emails? Do you feel like you’re not doing it correctly or that your messages are coming across the wrong way? Hvis så, bare rolig – du er ikke alene! Many people find email to be a difficult task.
But with a little bit of practice, and by using some of the tips and tricks we’ll share with you in this blog post, you can become an email pro in no time!
What is Gmail?
Først, let’s start with the basics. Gmail is a free email service offered by Google. Du kan bruge det til at sende og modtage e-mails fra personlige og forretningskonti.
Desuden, Gmail tilbyder flere funktioner, der gør det nemmere at administrere dine e-mails, inklusive:
- Muligheden for at oprette mapper til at organisere dine e-mails
- Evnen til at mærke dine e-mails
- Evnen til at søge efter specifikke e-mails
- Evnen til at oprette signaturer
- Evnen til at planlægge e-mails
Sådan opretter du en Gmail-konto
For at bruge Gmail, you will need to create a Google-konto. Once you have created an account, you will be able to access Gmail by visiting mail.google.com.
Once you’ve created an account, you’ll be asked to provide some basic information, inklusive:
- Dit navn
- Your email address
- Your password
- The country you live in

Create a Google Account
How to Send an Email on Gmail
Nu hvor vi har dækket det grundlæggende, let’s talk about how to send emails on Gmail. The process of sending an email is relatively simple:
- Først, compose your message in the “Compose” vindue
- Enter the recipient’s email address in the “Til” field
- Enter the subject of your message in the “Emne” field
- Write your message in the body of the email
- Klik på “Sende” knap
- You can also add attachments to your emails by clicking on the “Attachments” tab and selecting the file you want to attach.
How to Filter Emails in Gmail
One of Gmail’s most valuable features is its ability to filter emails. This means that you can create rules that determine how an email should be treated.
For eksempel, you can create a filter that automatically archives all of your old emails or one that labels all of your messages with a specific label.
Klik på Filters and Blocked Addresses tab in the Indstillinger to create a filter.

How to Send an Encrypted Email in Gmail
Gmail also allows you to send encrypted emails. Det hedder Confidential mode.
This means that the contents of your email will be hidden from anyone who might try to intercept it. The actions allowed to do with the email by the recipient will be limited too.
All you need to do is click on the Confidential mode button in the Compose vindue.
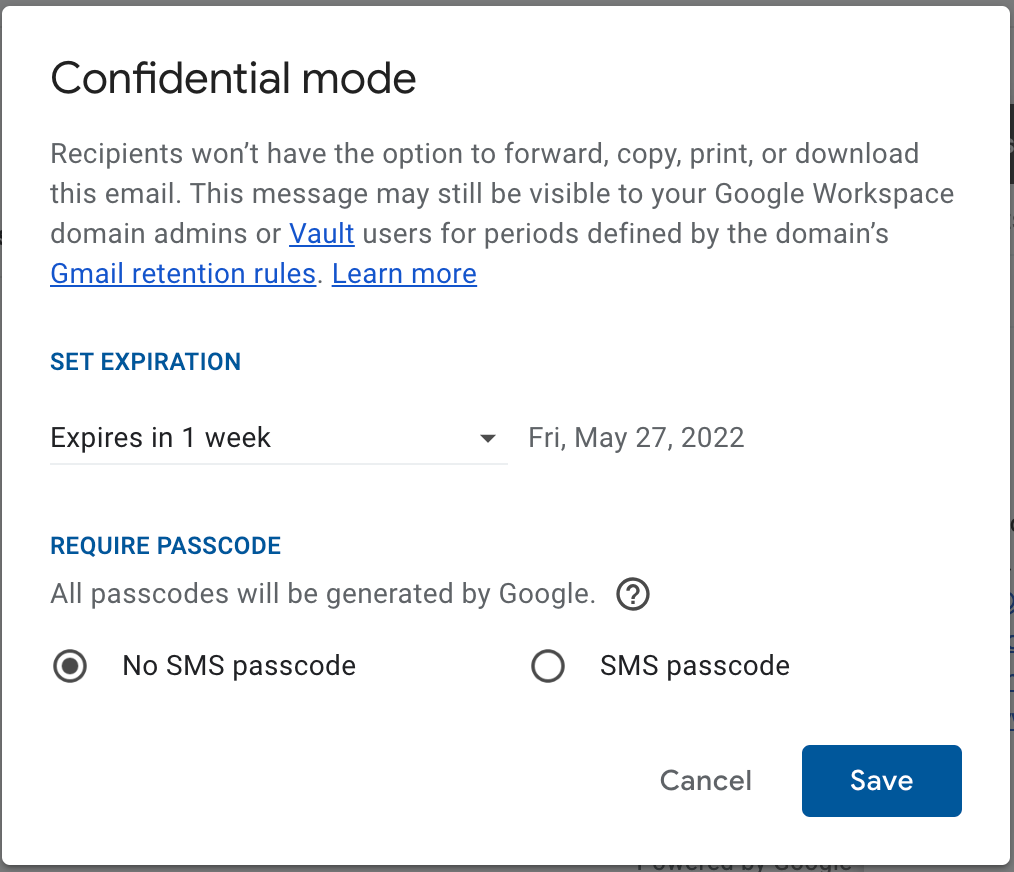
Set expiration date and switch on passcode for maximum protection
How to Retrieve Deleted Emails from Gmail
If you accidentally delete an email, bare rolig – you can still retrieve it! Gmail stores all of your deleted emails for 30 dage, and you can access them by clicking on the Trash folder. If you want to delete an email permanently, select it and click the Delete forever.
How to Recover Gmail Password
If you forget your Gmail password, bare rolig – you can recover it! Besøg https://mail.google.com/ and click on the Forgot password? link to recover your password. You will be asked to provide some basic information, inklusive:
- Dit navn
- The email address associated with your account
- The country you live in
Once you have provided this information, Google will send you a link that will allow you to reset your password.
How to Make a Signature in Gmail
En signatur er en kort besked, der automatisk tilføjes i slutningen af alle dine e-mails. You can create a signature by going to Indstillinger and scrolling down to the Underskrift valgmulighed i Generel.
Du kan derefter skrive din signatur i tekstfeltet. You can also add a picture or a link to your website. Note that you can create several signatures and switch between them in the Compose mode (when writing an email).

Vigtig! Don’t forget to save the changes after adding a signature!
Sådan kommer du til arkiverede e-mails i Gmail
Hvis du vil have adgang til e-mails, som du har arkiveret, you’ll have to search for them in the All Mail tab in your right-hand menu. Those email will have an option to send them back to Inbox. Or you can drag them back.
Sådan sletter du gamle e-mails i Gmail
Hvis du vil slette gamle e-mails fra din konto, you’ll have to filter them out by conducting a search with “Før:YYYY/DD/MM” command (without commas). You’ll see the list of all emails received before the date in the query. Select the all then and press Delete – Trash icon. If you wish to delete them forever, go to the Trash and delete them forever.
Sådan ændrer du din Gmail-adresse
Hvis du vil ændre din e-mailadresse, undskyld, you can’t. Imidlertid, you can add another email address to your Gmail and send mail from another address. Det er mærkeligt, but someone found this useful.
To add another email go to Indstillinger og Konto fanen.

Sådan vælger du alle e-mails i Gmail
Hvis du vil vælge alle e-mails i din indbakke, du kan gøre det ved at klikke på Vælg alle knappen på værktøjslinjen. This will select all of the emails on the page. But you will see a message on the top of the page telling “Alle 50 conversations on this page are selected” (it can be more depending on your page length settings). Near, Google will suggest you selecting other messages that are beyond that list. Do so.
Du kan derefter slette, bevæge sig, eller svar på dem alle på én gang.

Sådan planlægger du en e-mail i Gmail
Hvis du vil planlægge en e-mail til en senere dato, you can do so by choosing a Tidsplan send option near the Sende button in the Compose vindue. Du kan derefter indtaste den dato og det tidspunkt, du ønsker, at e-mailen skal sendes. Gmail sender derefter e-mailen på det tidspunkt.
Tips til at administrere e-mails som en professionel
Nu hvor du ved alt, hvad der er at vide om at bruge Gmail,
Her er et par tips til at administrere dine e-mails som en professionel:
- Opret mapper til at organisere dine e-mails: Du kan oprette mapper i Gmail for at organisere dine e-mails. Dette vil gøre det nemmere at finde de beskeder, du leder efter.
- Brug etiketter til at markere vigtige e-mails: Du kan bruge etiketter til at markere vigtige e-mails. Dette vil gøre det nemt at finde de beskeder, du skal henvise til senere.
- Brug søgefeltet til at finde e-mails: Søgelinjen kan bruges til at finde specifikke e-mails, som du leder efter. Dette kan være nyttigt, hvis du har mange e-mails i din indbakke.
- Brug filtre til at sortere dine e-mails automatisk: Du kan bruge filtre til at sortere dine e-mails automatisk. Dette vil gøre det nemmere at finde de beskeder, du leder efter.
- Bloker spam-e-mails: You can block spam emails by adding the email address to the “Blocked Senders” liste. This will prevent the emails from being sent to your inbox.
- Aktiver to-faktor-godkendelse: You can enable two-factor authentication to increase the security of your Gmail account. This will require you to enter a verification code each time you sign in to your account.
- Backup your emails: You can backup your emails by exporting them to a file or printing them out. Dette vil sikre, at du har en kopi af dine e-mails, hvis der sker noget med din konto.
- Slet unødvendige e-mails: Du kan slette unødvendige e-mails for at frigøre plads i din indbakke. Dette vil gøre det nemmere at finde de e-mails, du har brug for.
- Planlæg, at e-mails sendes på et senere tidspunkt: Du kan planlægge, at e-mails skal sendes på et senere tidspunkt. Dette kan være nyttigt, hvis du vil sende en e-mail på et bestemt tidspunkt.
- Brug “Arkiv” to store old emails: Du kan bruge “Arkiv” to store old emails. Dette vil frigøre plads i din indbakke og gøre det nemmere at finde e-mails.
Tips til at skrive professionelle e-mails i Gmail
Du er på rulle; nu, vi deler nogle tips til at holde dig på vej i den rigtige retning.
- Tiltal altid modtageren ved navn: Når du sender en e-mail til en kollega eller klient, det er vigtigt at adressere dem ved navn. Dette vil vise, at du tager dig tid til at personliggøre dit budskab, og at du respekterer dem som person.
- Vær klar og kortfattet: Når du skriver en e-mail, sørg for at holde dine sætninger korte og præcise. Dette vil gøre din e-mail lettere at læse og forstå.
- Undgå at bruge slang eller uformelt sprog: Slang og uformelt sprog kan få din e-mail til at virke uprofessionel. I stedet, hold dig til standard engelsk, når du skriver e-mails, medmindre du er sikker på, at modtageren vil være bekendt med de slangudtryk, du bruger.
- Undgå at bruge forkortelser: Forkortelser kan forvirre modtageren og fortolkes muligvis ikke, som du har tænkt dig. Derfor, det er bedst helt at undgå at bruge dem.
- Læs korrektur på din e-mail inden afsendelse: Dette er især vigtigt, når du sender en e-mail til en klient eller kollega. Typos and mistakes can make you look unprofessional.
- Check the recipient’s email address: Ensure that you have the correct email address before sending your message. If you accidentally send an email to the wrong person, it can be embarrassing and damage your relationship with the recipient.
- Format your email using a standard font: Arial or Times New Roman are good choices. They are easy to read and look professional.
- Include a clear subject line: Emnelinjen i din e-mail skal give modtageren en kort idé om, hvad e-mailen handler om. Dette vil hjælpe dem med at beslutte, om de vil læse den eller ej.
- Afslut din e-mail med en høflig afslutning: “Med venlig hilsen,” “Med venlig hilsen,” eller “tak skal du have” er alle gode valg.
Nu hvor du ved, hvordan man skriver professionelle e-mails i Gmail, du kan føle dig tryg ved at kommunikere med kunder og kolleger. Bare sørg for at følge disse tips, og du vil være på vej til at sende vellykkede e-mails.
E-mails er vigtige for en succesfuld e-handelsvirksomhed
Ecommerce is a huge industry, og der er mange måder at sælge online på. Men, no matter what type of e-handelsvirksomhed du har, en e-mail vil altid være en væsentlig del af processen.
Ecwid kan hjælpe dig get your online store up and running while providing helpful resources like managing listings on multiple sites, ordrer, beholdningssporing, og mere. Kom i gang gratis i dag, og se, hvordan Ecwid kan hjælpe!

- Didn’t Migrate to Google Analytics 4? Here Is Why You Need to Do That Now
- Google My Business 360: Sådan vinder du en lokal konkurrence
- En nem måde at tjene mere på Google My Business
- A Complete Guide to Google Analytics for Ecommerce
- Sådan Tilføj Google Analytics til Din Online Store
- How to Set Up Daily Ecommerce Reports in GA
- Hvad er Google Tag Manager
- How To Use Google Tag Manager
- What Is Google Search Console
- How To Set Up and Use Google Search Console
- Google Domains: Hvad er det, and How Does It Work?
- Gmail: Sådan skriver og administrerer du e-mails som en professionel
- The Ultimate Guide to Google Docs


