


Google Search Console (GSC) is a powerful and free platform that lets you track and manage your site’s search performance. Getting started is pretty easy, and the
Google is an expansive search engine, so GSC has a lot to offer. In this guide, we’ll cover everything you need to get started — from making your account to getting verified and more. We’ll also talk about GSC’s most important tools and insights so you’re ready to get the most out of the platform.
Here’s how to use Google Search Console.
How To Set Up Google Search Console
First up, how to set up Google Search Console. Like other Google tools, you’ll need a Google account to launch your GSC account. The Google account you use to launch GSC will function as the owner of your GSC account, so be sure to use one that’s up for the job.
Google lets you use your personal or work account credentials for GSC, or you can use the details from a Google Analytics or Google Ads account.
Once you’ve picked an account or made a new one, head over to the Google Search Console welcome page.
From here, enter a domain or a URL prefix. Since you’re just getting started with GSC, you should probably enter a domain. Entering a URL prefix limits GSC’s function to a single portion of your website while entering an entire domain gives the platform (and you) access to every level. If you don’t launch your GSC account with your whole website, you’ll limit your ability to improve search performance to a small section of your site.
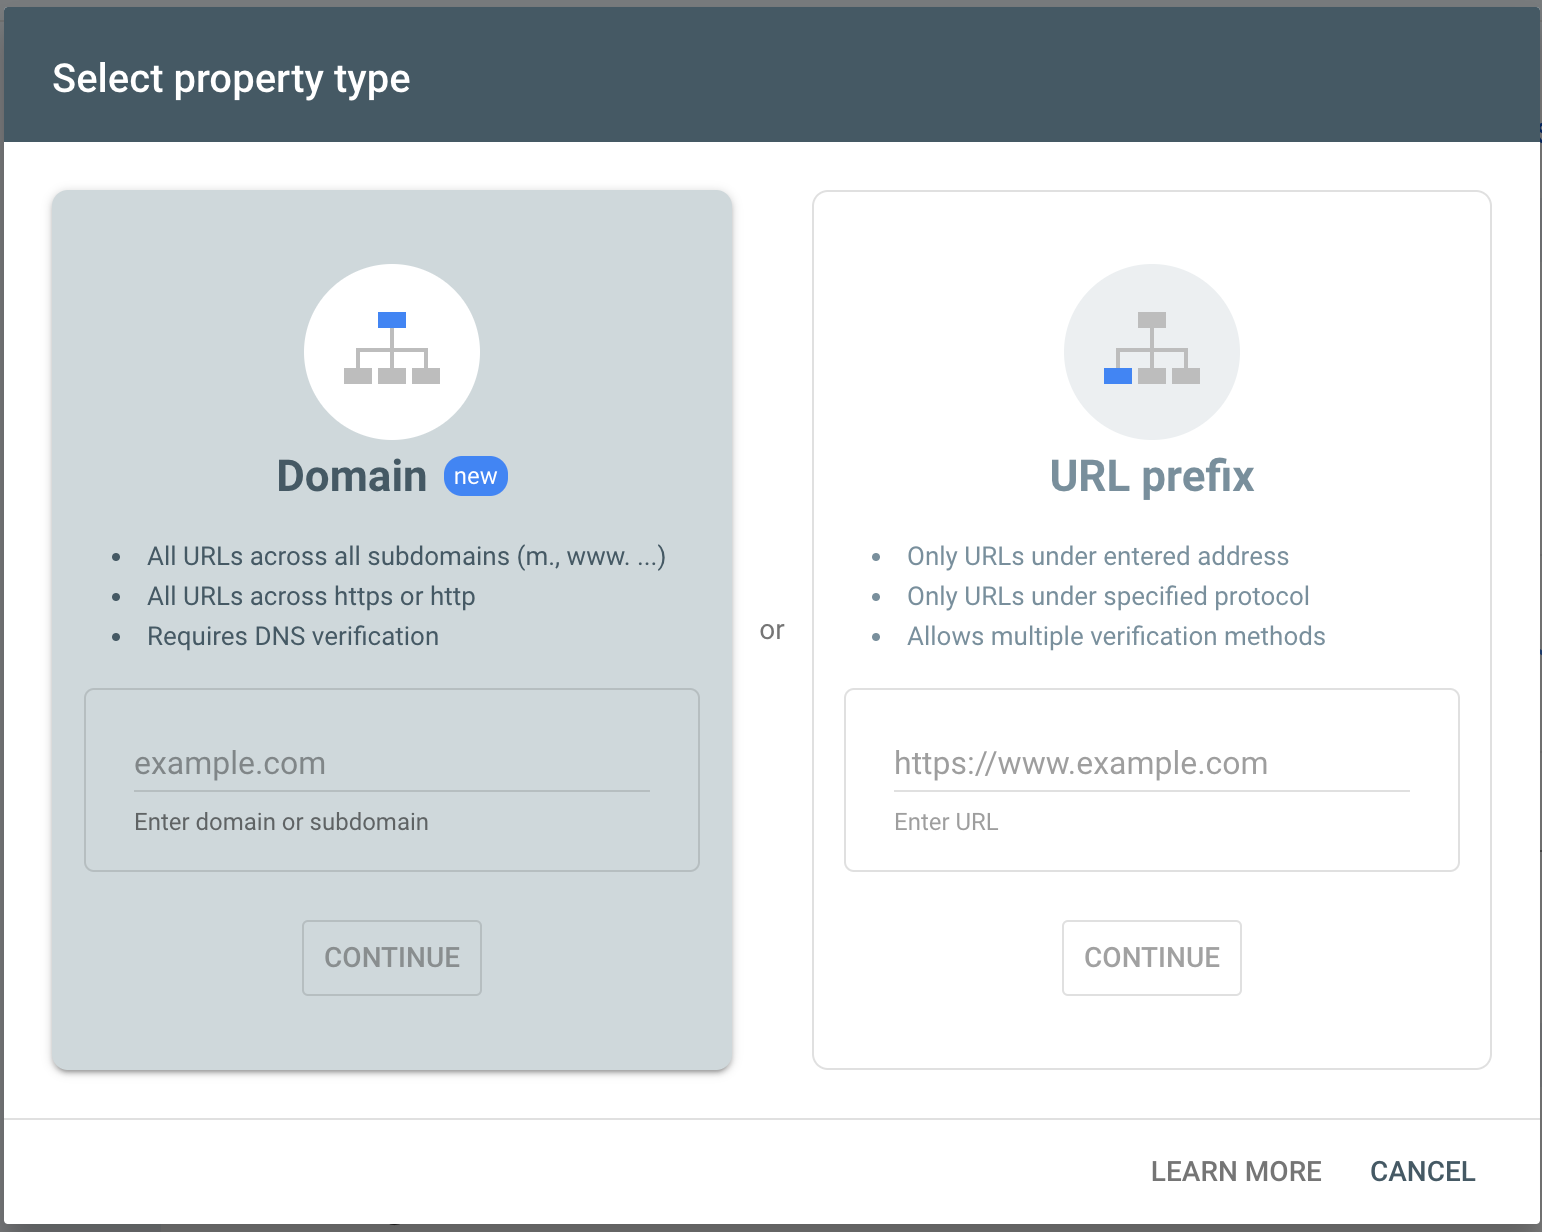
Creating a new property in Google Search Console
In many cases, site owners use a URL prefix since verifying domain ownership is a little more complicated. But if you can, sticking with a domain is better. The verification process takes a little longer, but it’s worth the effort.
Speaking of verification — that’s your next step. Here’s how to verify site ownership on Google Search Console.
Google Search Console Verification
Google wants to make sure you actually own your website before they give you access to important search performance data. As we talked about, the verification process depends on whether you entered a URL prefix or a domain. While verification for a URL prefix can take a few paths, domain verification has just one method.
Before we dive into each verification process, let’s define some key terms you’ll need to understand.
- Property — a broad term for websites, single URLs, mobile apps, and other online assets people or businesses own
- Domain — the name of a website without http(s):// and www, such as ecwid.com
- Subdomain — extensions added to domains, such as my.ecwid.com
- URL — the address for a webpage (a domain is the name of a website while a URL is an address for a specific page within that website)
- URL Prefix — the protocol that appears before a domain (for example, http:// or https://)
Site verification for a Domain property
Verifying a
The next steps will vary slightly depending on your provider, but we’ll cover everything you need to know to successfully complete the verification process.
On the
No matter who your provider is, you’ll need a TXT record starting with
If your provider is listed in the
After entering your TXT record, you should see a message confirming successful verification. This process can take a few days, so be patient. If you don’t get confirmation,
Site verification for a URL Prefix property
If you can’t or don’t want to verify a domain, you can verify a URL prefix instead. (Again, verifying a
You have a few verification options — and all of them require some technical skill. If you don’t have experience dealing with the technical side of your site, you might want to work with someone more familiar with the subject.
Even though any URL prefix verification method can work, Google recommends verifying with an HTML file.
This method requires access to the root directory of your website — which means you’ll need access to your server. Do not attempt this method if you don’t have experience with your root directory.
- Select HTML file from the verification options menu, then download the provided file
- Access the root directory of your site and upload the file
- Return to the GSC verification page and click Verify
If everything works properly, you’ll see a message confirming verification.
How To Add User to Google Search Console
With verification out of the way, it’s time to actually start using Google Search Console.
GSC is often used by teams, so adding users is important. Google makes this easy by offering four main permissions levels: Owner, full user, restricted user, and associate.
- Owners are in charge of the GSC account. They can remove and add other users, change user permissions, and view all the details about their search performance.
- Full users have a similar level of access, but they can’t add and remove users.
- Restricted users are further limited and can only view data allowed by the owner.
To add a user to Google Search Console, open GSC and select the relevant property. Click on the settings icon, then the Users & permissions tab. Click Add user, then follow the
To remove a user, access the same Users & permissions tab. You’ll see a list of active users — look for the user you’re removing and click on the menu next to their name. Finally, select Remove access.
With all your users ready to go, it’s time to give Google a sitemap.
Google Search Console Sitemap
A sitemap is exactly what it sounds like — a map of your website and its content. The map is given to Google as a file containing information about your site’s pages, photos, videos, and other media.
The map helps Google’s search engine understand your website and how its components interact. Google uses the map to crawl your site more efficiently, which can ultimately improve your search performance.
Do I need a sitemap to use Google Search Console?
No, you don’t need a sitemap to use GSC and your pages can be indexed without one. However, it might be a good idea to submit one anyway.
In most cases, sitemaps are important for large websites since Google could have trouble crawling them properly. There isn’t a
Sitemaps are also useful if your pages are isolated. For example, Google might have trouble crawling and indexing if your home page and shopping pages aren’t interlinked. You can fix this by crosslinking your content and pages, or by submitting a sitemap.
How do I find my sitemap and submit it to Google Search Console?
You can submit a sitemap using GSC if you decide it’s necessary for your situation. First, locate your sitemap. Not all sitemaps are in the same place, but you can typically find yours by searching for your domain followed by one of the following:
- /sitemap.xml
- /sitemap_index.xml
For example, https://www.ecwid.com/sitemap.xml
Once you have your sitemap, go to GSC and pick the relevant property. Next, look for Index, then Sitemaps on the navigation panel. If you’ve submitted sitemaps in the past, remove any outdated submissions, then add your new map by following the instructions under Add a new sitemap.
Google Search Console Tools You Should Use
With your account made and ready to go, it’s time to use the platform’s tools.
Some tools may be more valuable than others depending on your specific website and situation. However, there are three tools that all website owners should use to get started. Here’s what they are, how to access them, and how to use them.
The Performance Report
New GSC users should look at their Performance Report right away. This tool shows you how your site performs in Google Search results, including its average position,
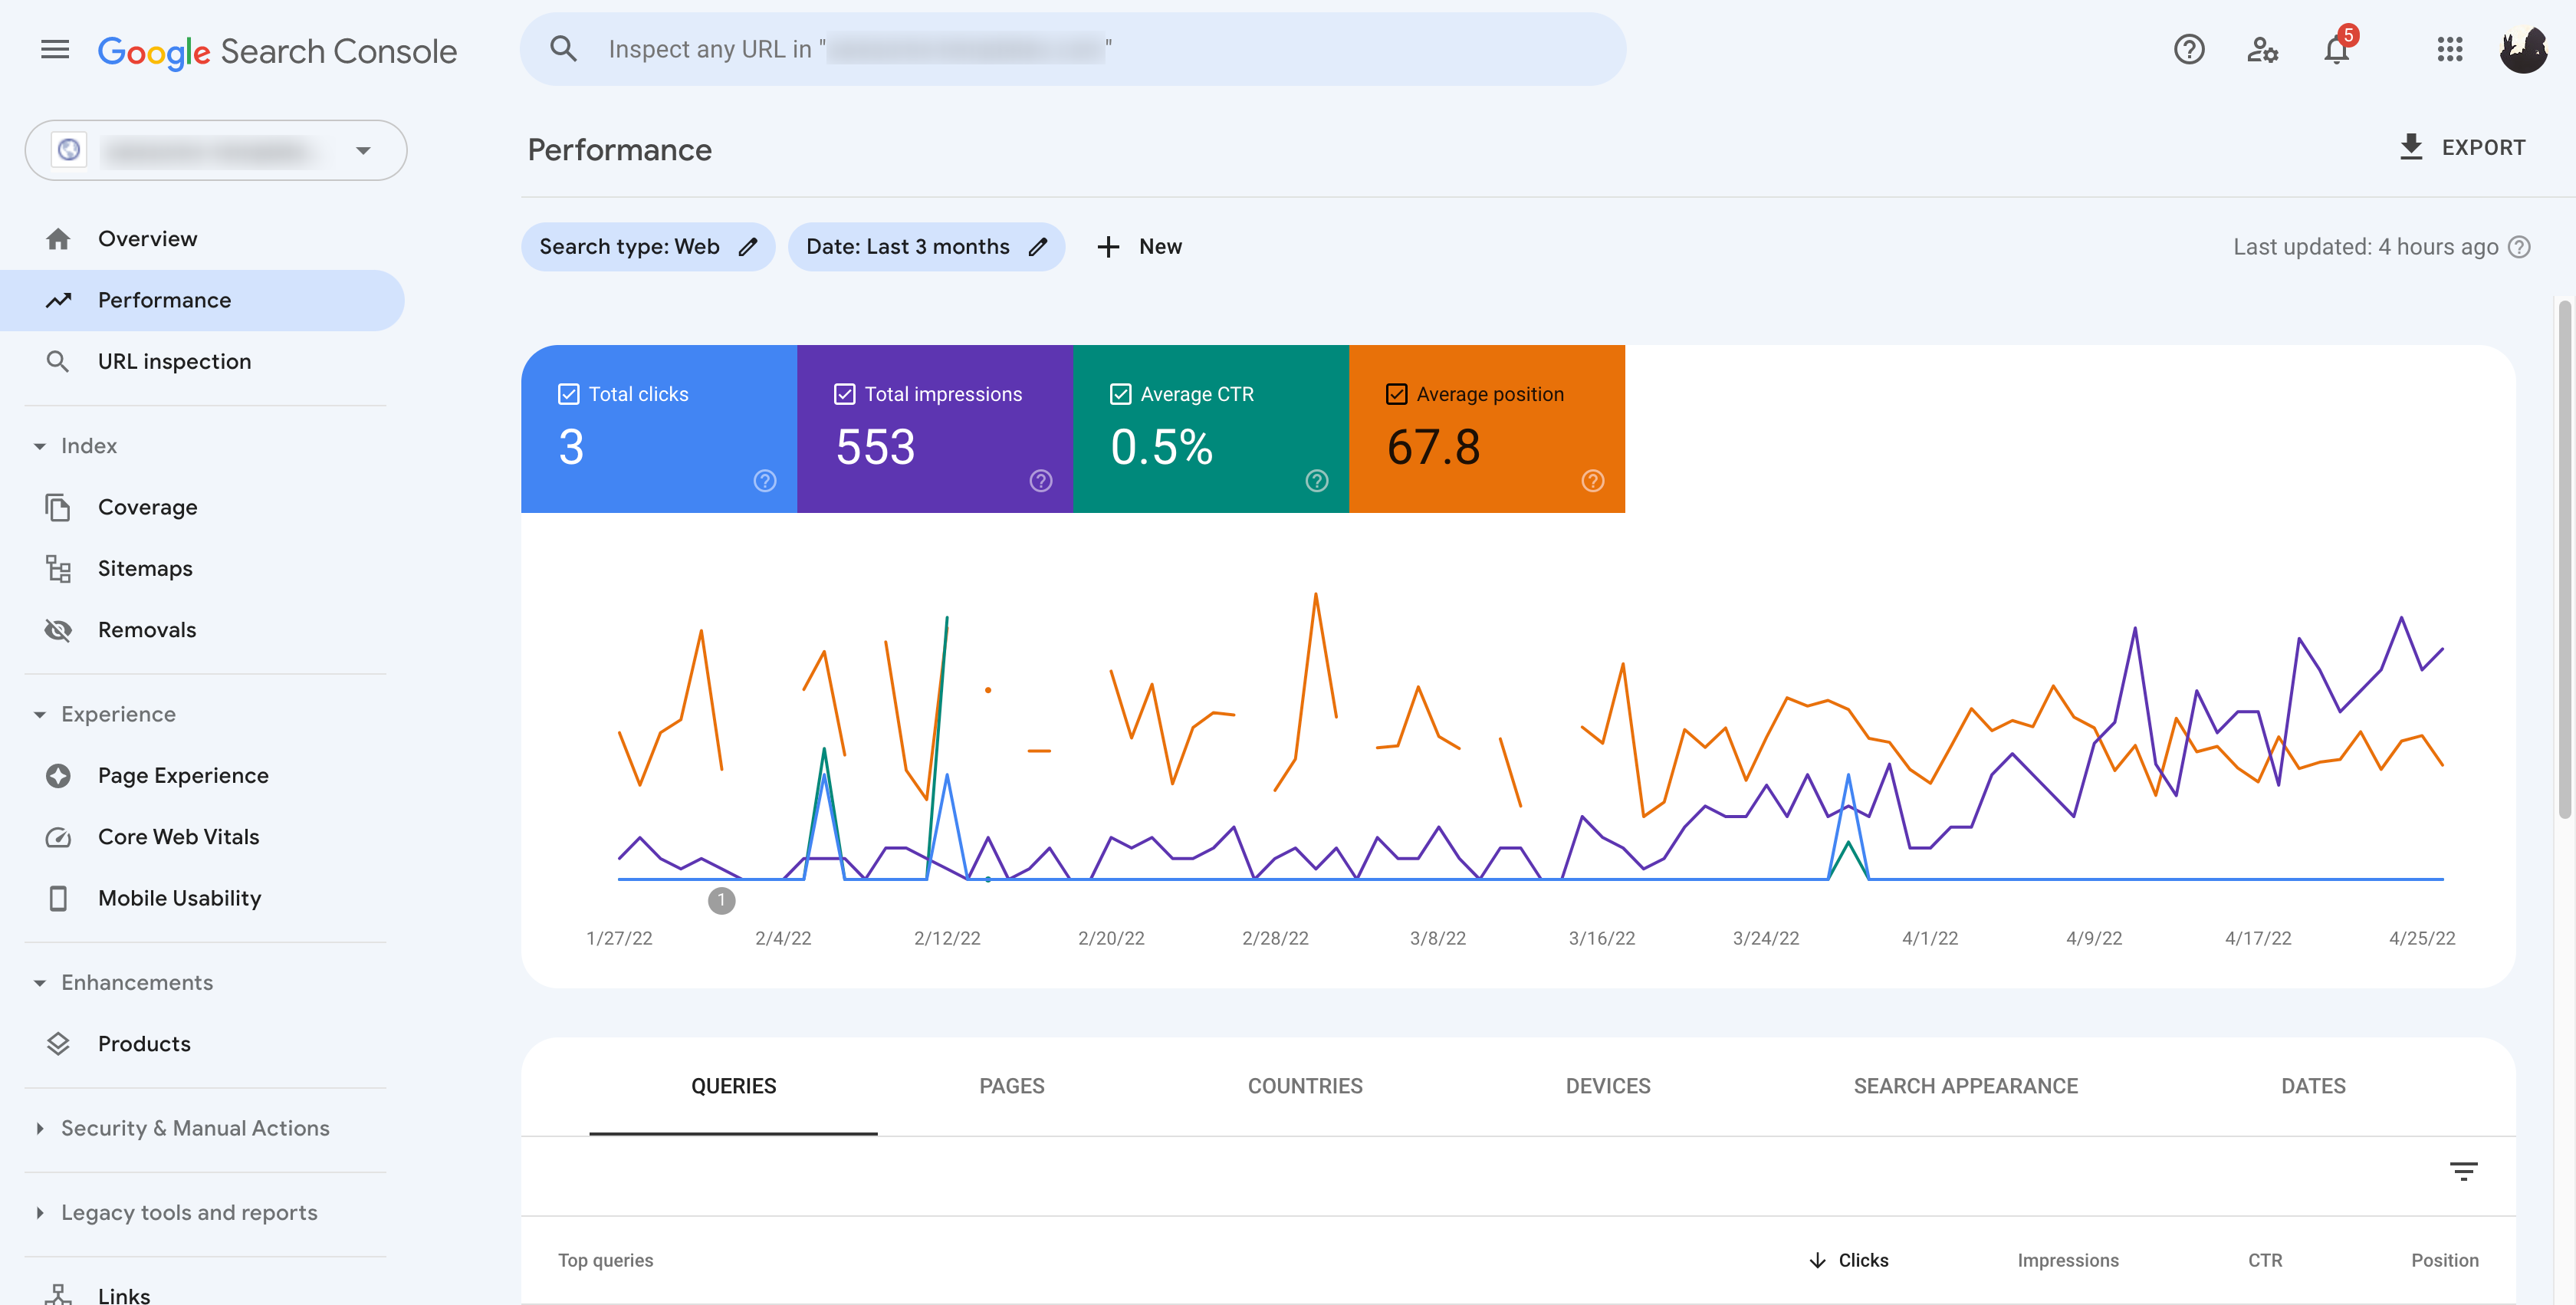
After opening your report, you can view the data
- On your report page, click + NEW in the filter section
- Add the relevant filter
- View the updated data
Google Search Console Remove URL Tool
Site owners may need to block certain URLs from entering the search results page — and they can do that with the Removals tool. This tool temporarily removes URLs from the search results page. If you need to remove a page permanently, Google requires a separate process.
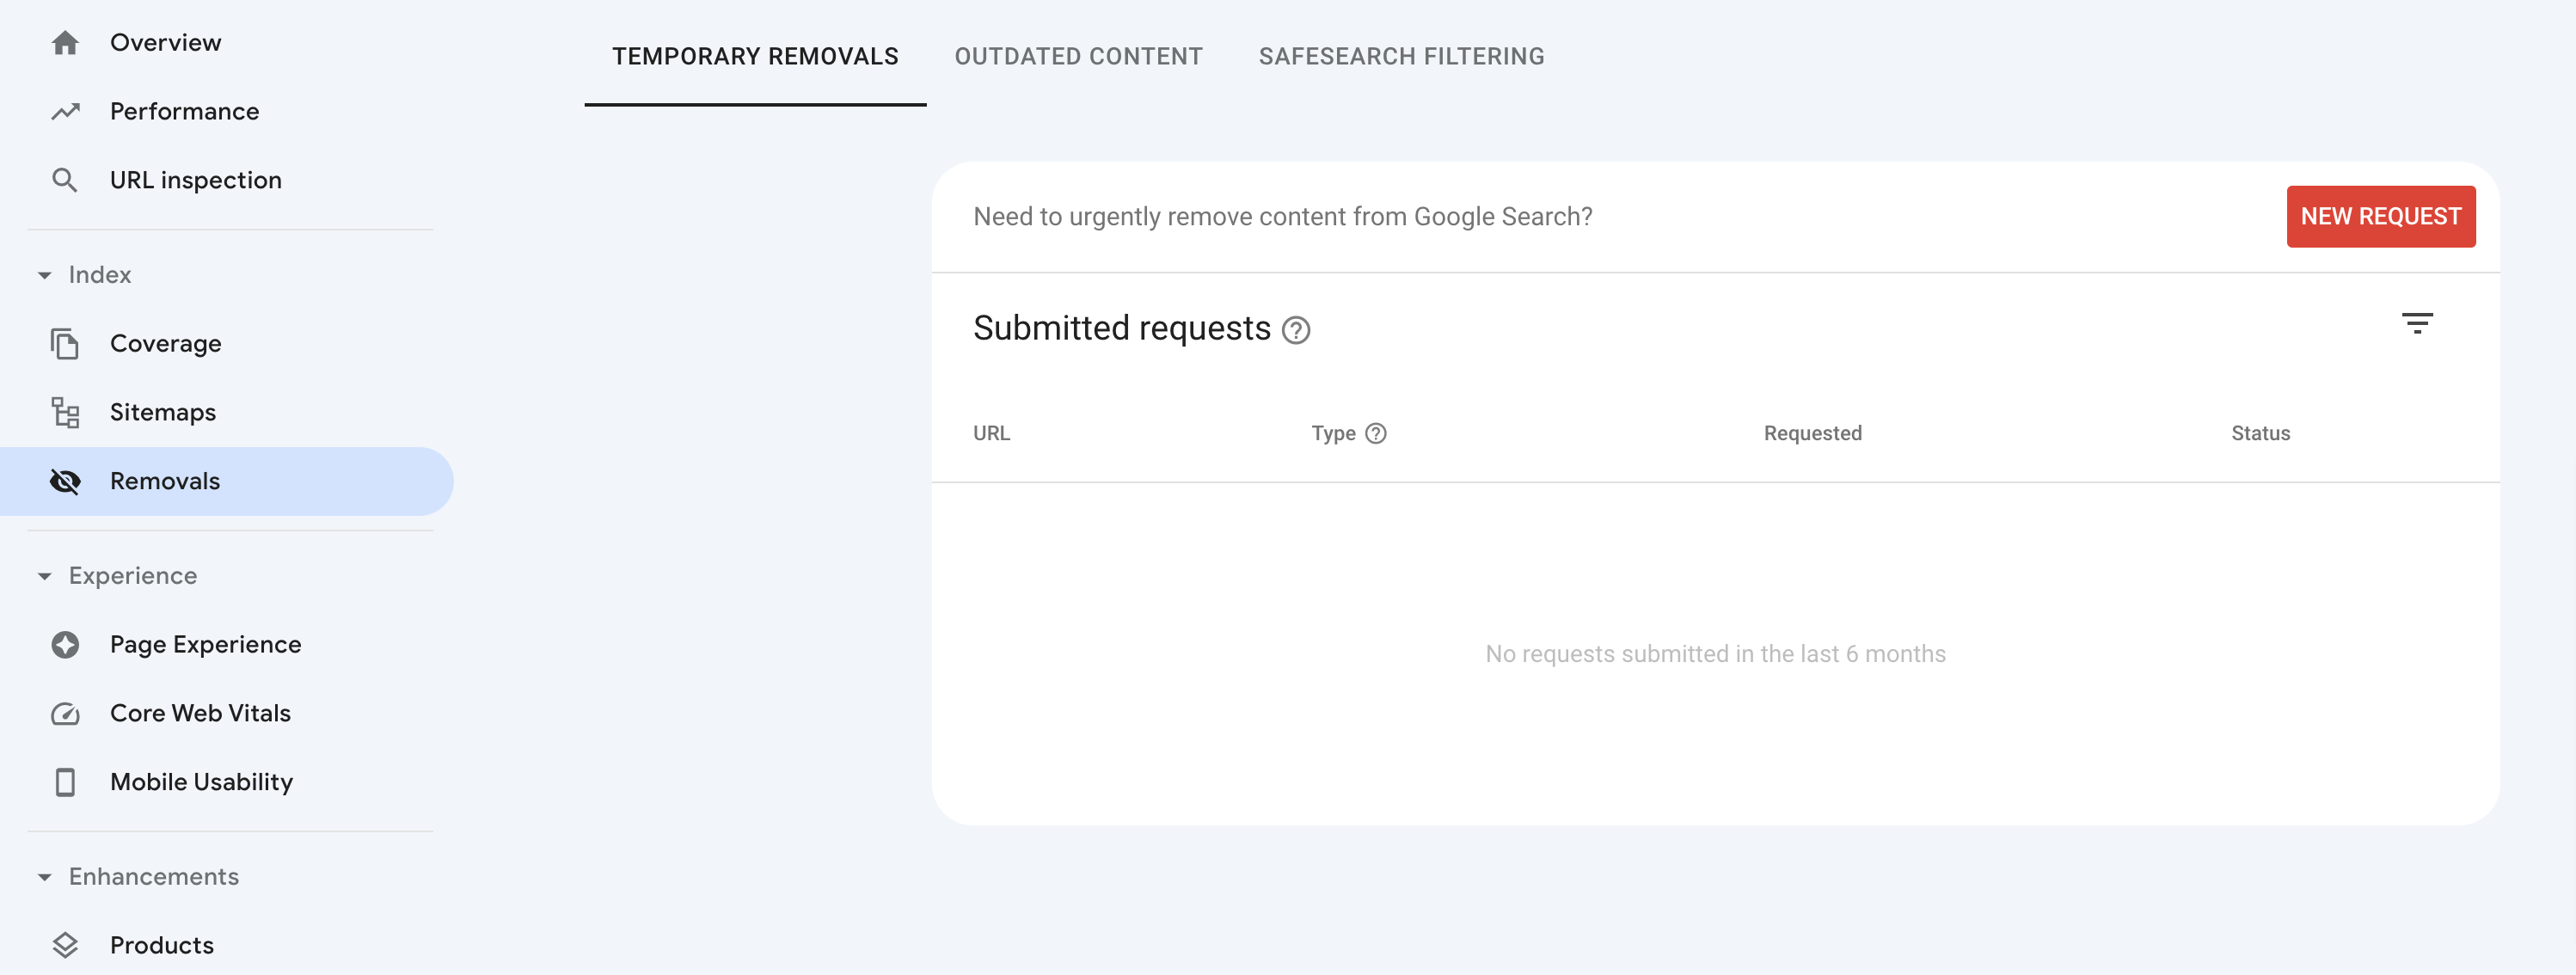
Using the Removals tool keeps a selected URL from the search results for about six months. The URL you’re removing has to be part of a property you own. Google doesn’t always accept removal requests, but you will be notified if and why your request is rejected. If you have multiple URLs that could point to the same page, you can submit them for removal alongside your main URL.
- Open the Removals tool
- Click on the Temporary Removals tab and select New Request
- Select Temporarily remove URL and provide the URL
The Coverage Report
As we talked about, Google sometimes has trouble crawling and indexing pages. The good news is Google tells you if and when this happens via Index Coverage reports. These reports alert you to any indexing problems, tell you which pages have been properly indexed, and show you which pages Google found on your site.
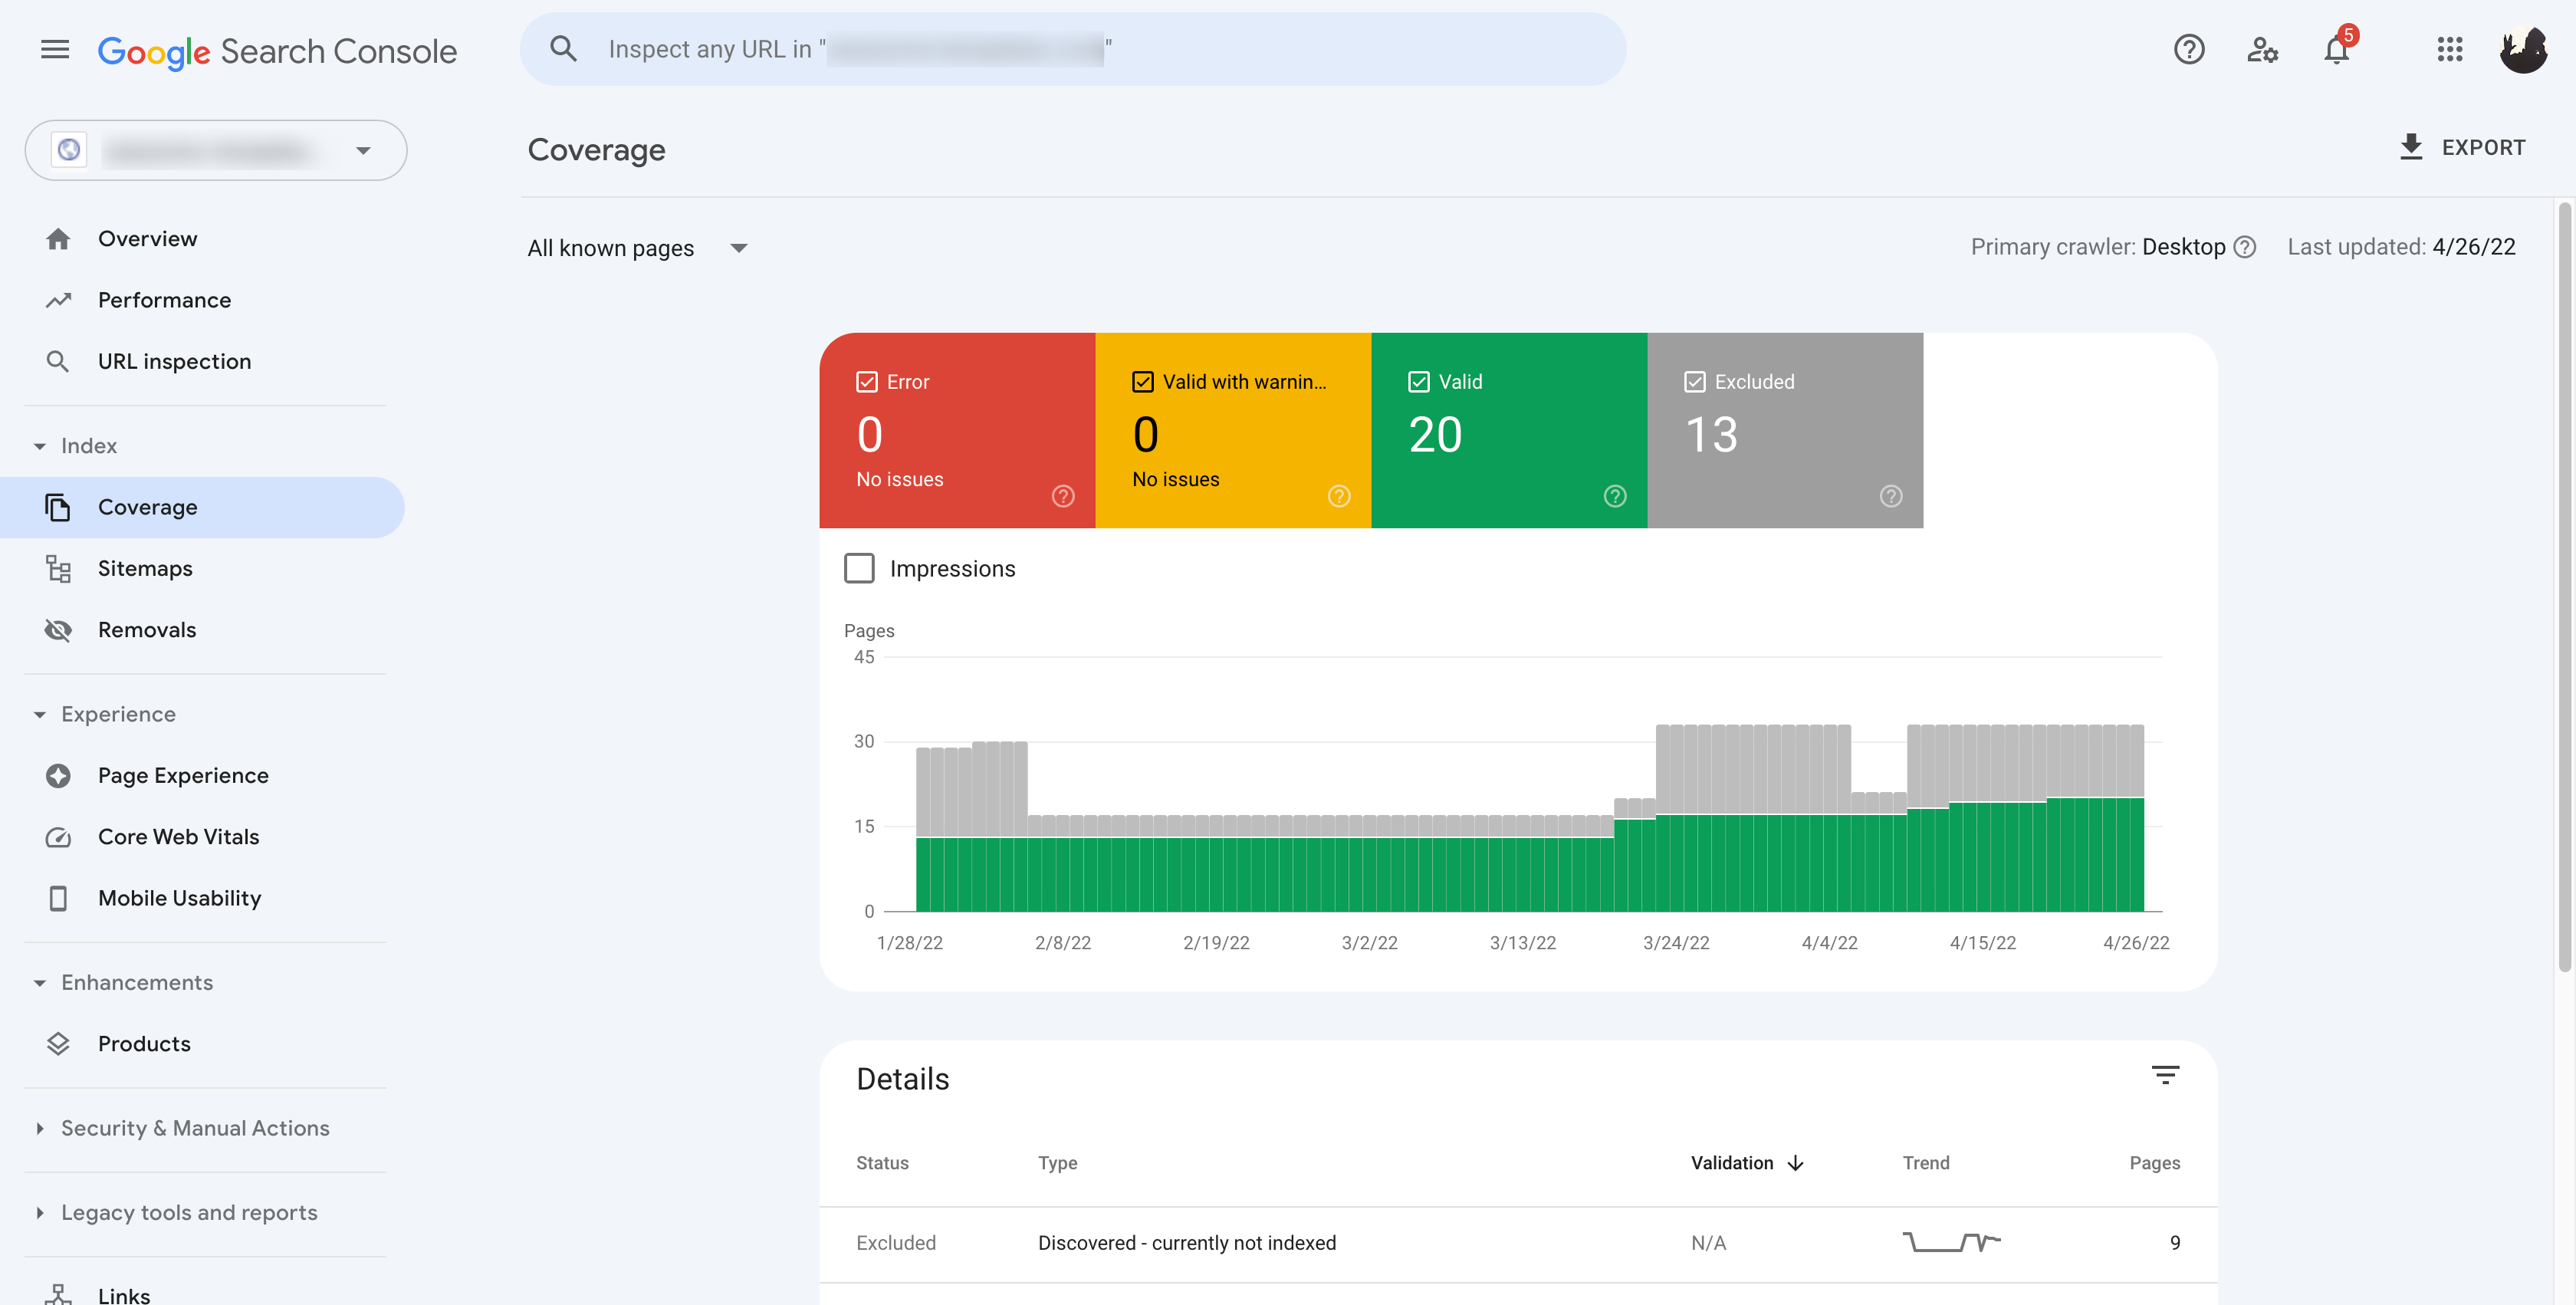
You can access your index coverage report by opening GSC and looking at the left side of your screen. Under the Index tab, click on Coverage. The default view has an Error tab, that’s where you’ll learn more about indexing problems.
- On the Index Coverage report page, select the Error tab
- Scroll down to view each error (Google tells you what the problem is)
- Resolve one of the errors, then
re-check your Coverage report to see if the fix was successful
Get Started Today!
Those three tools are really just the beginning of Google Search Console. Once you get your account up and running, you’ll have access to a ton of valuable features to improve your site’s search performance. Google is the biggest search engine in the world, so get started today!

- Didn’t Migrate to Google Analytics 4? Here Is Why You Need to Do That Now
- Google Analytics 4 (GA4) Basics for Ecommerce Businesses
- Google My Business 360: How To Win A Local Competition
- An Easy Way to Earn More on Google My Business
- How to Add Google Analytics to Your Online Store
- What Is Google Tag Manager
- How To Use Google Tag Manager
- What Is Google Search Console
- How To Set Up and Use Google Search Console
- The Ultimate Guide to Google Docs


